|
PeterSt
|
 |
« on: May 11, 2015, 12:40:19 pm » |
|
Edit May 24, 2015 : Because of some issues with the 2.00(-a) version, the download for it has been removed. A new 2.01 version will be up soon.
Activate this new main version by means of obtaining a new Activation Code through PayPal (72 euros). This is not a free upgrade. Install any new version in its own folder (your Activation could be violated otherwise).
This version of XXHighEnd is all Remote Control (Tablet and Smart Phone) oriented. Edit May 13, 2015 : There's a new 2.00-a download (at the bottom). No need to download this if you are up and running with the former 2.00 download.
Notice : By now many people think that XXHighEnd was made for - and can only be used with the Phasure NOS1(a) D/A converter. This is not so at all; XXHighEnd emerged 3-4 years before the NOS1 and remains to support all DACs explicitly, providing the best sound quality imaginable.
Release Notes- All screen shots shown in real (tablet) size as denoted by the Scaling Factor in XXHighEnd of 2.30 (via the [ S ] button near the bottom - also see 2nd screenshot below).
- Watch out : The default Scaling Factor of this XXHighEnd version is 1.7; this actually assumes 1280x1024 (minimum) monitors. When you have a lower resolution monitor the XXHighEnd screen will adapt to that but things may look strange. In that case, please notice this :
In the left you see the Preset Buttons and under Preset 2 (see mouse arrow) is a smaller version available with Scale Factor 1.4; this was the default for the previous XXHighEnd versions. So if you see problems, click that button, restart XXHighEnd and proceed from there. Also notice that you can set your own Scaling factor by using the button you see below under the mouse arrow :
In there you will also find settings for how the playback buttons look like and how the images on them (see screenshot above) can be removed, etc.
- Because of the 9 weeks the making of these Release Notes took for throughput time, many of the screen shots do not resemble the latest layout for button posititions and that kind of stuff. This is not important but where it is important, the actual version is shown. Colours are wild all over the place anyway, as these can be set by yourself or depend on the Coverart used for the screen shot concerned (which is a setting which can be shut off).
- Important : Anyone downloading the 2.00 version within the minute after seeing it - you will be forgiven.
 Reading through these Release Notes, 10 x larger than ever before, may take an hour or two to begin with and then we didn't ask you to comprehend which may take a week. Questions ? ask them very strictly in their own new topic on the forum. But, allow us to simply reply with a "Is in the Release Notes !" so you will know it is in here. Use Ctrl-f in your browser to find the subject, which most probably will just work fine. If we see in advance that this will be tough for the question concerned, we will give you a further hint. Reading through these Release Notes, 10 x larger than ever before, may take an hour or two to begin with and then we didn't ask you to comprehend which may take a week. Questions ? ask them very strictly in their own new topic on the forum. But, allow us to simply reply with a "Is in the Release Notes !" so you will know it is in here. Use Ctrl-f in your browser to find the subject, which most probably will just work fine. If we see in advance that this will be tough for the question concerned, we will give you a further hint.
And of course, when the outlay in here does not suffice we will deal with it as usual and explain it in the topic itself.
Most crucial anyway will be that you make that topic for your question and that the title will cover for whatever it is you want to ask. 
Please consider that private messages or email will not be responded to.
Remote Control- As a mere general topic, all what's required to reach on the tablet (Remote Control) with the larger finger tips has been made large enough to easily operate. This includes album/track selection, playback in the most easy fashion, and put to Galleries on the fly. The latter in more general : all what is needed for Gallery operation (put to, or select from) has now been made for tablet usage.
Remember : To operate XXHighEnd from the tablet, the user interfcace must be scaled and set to your needs and tablet size.
Side note : While you will be reading about "tablet" it is allowed to read "smart phone" just the same; most of the Release Notes text was made prior to when all was made to work for smart phones.
- A new interface (screen) has been created for selecting a Gallery Folder from "explorer" at adding music to a Gallery, meaning :
Selecting folders from normal Explorer is tedious from the tablet (because the content shows too small to be really selectable with fingers). So there's now a new "Select from Tablet" and this opens a form with large tapable hyperlinks, those hyperlinks resembling the main Gallery Folders.
Notice that the list is sorted with the (new, see more below) Show Gallery on top, then the Demo Gallery, then the Nice Stuff Gallery and then the others on alphabetical sequence (ascending or descending per click on the header).
So notice what this is about : Normally from the tablet it was only feasable to add to the Demo - and Nice stuff Gallery (plus now Show Gallery), because the other Gallery Folders were not really selectable (too small to tap conveniently). Now, all the folders in your Gallery can easily be selected and if you play something you think should go to Jazz (which is not your Demo etc.) Gallery you can do that on the fly just the same.
Crucial : The Scroll Bar of this screen is relatively tiny and it is hard to touch it correctly with a finger for scrolling. This is why this can be "flick scrolled" (swipe vertically to change the part in view). Also see more below about Flick Scroll in general.
Notice : The Favorites form (triggered by means of the [ F ] button in the bottom of XXHighEnd) has been made very much the same;
For those who don't know : That shows the most frequently used folders sorted by most used (on top) and from this list such a folder can be re-selected (tap) followed by pressing Search in the bottom of XXHighEnd (Library Area active) to (re)load that folder contents in the Library Area.
The sequence can be re-sorted to least frequently used, or just alphabetical on folder name (ascending or descending).
- The On Screen Keyboard (OSKXX.exe) now has different colours for the shortcut keys (Like Alt-u) and the grouping of them is now intuitive.
Additionally a "command" key has been added, so groups of keys can be selected (two of them).
See the "command" button in the bottom left corner;
You can easily see when you're in Cmd-2 by means of the blue coloured texts in the button itself, *and* in the buttons which apply to Cmd-2.
- The OSK (On Screen Keyboard) now retains its set shape from the previous session (like bar, phone, tablet and full keyboard).
Also, changing the layout now expands downwards (previously this was upwards so the "title bar" could not be grabbed for repositioning).
- From the OSK we can now decide to start XXHighEnd in the usual "Playlist Area" mode, or to directly jump to the Library Area;
The normal startup to the Playlist Area is the Alt-XP you see above (or Alt-x for normal keyboard command) and the startup to the Library Area is the Alt-XL you see (or the new Ctrl-Alt-y normal keyboard command).
- In the Settings Area there's a new button "use Touch Facilities" and when this is activated, this happens :
In the Playlist Area, tracks normally are selected by clicking them; Click one, and that tracks get selected, click another and the previously selected one gets un-selected. This, unless you hold the Ctrl key on your keyboard, then previously selected tracks remain selected.
Now, when using a tablet without keyboard, no real means exist to hold down a Ctrl key, hence no means exist to select more than one track. Notice then when more tracks are selected, all those will play and the others will not (and when one track only is selected, all will play starting from that track);
With this new button activated, each tap (or click) on a track will additionaly select it, hence leave the others selected too.
Tap/click a once selected track will un-select it.
Clicking on the [ P ] button in the top will un-select all tracks (and pressing Play now will start playback at the first track).
In the Library Area the same applies (click one Item, normally will un-select the other(s);
Here too, with this button active, tapping/clicking an Item will select it and will let remain the other(s) selected.
When you want to un-select previously selected Items, tap/click near the edge at the right side (see at the mouse arrow) :
Do notice that coincidentally too few space may exist there, which now is a matter of "creating" that space, for example by dragging the [ 2 ] button somewhat more to the right. It also depends on the picture size which can be controlled by this slider (see at the mouse arrow) :
- Next to the button for the Touch Screen Facilities, there's a new button "Use Standard Windows OSK". It gets activated when the Touch Facilities are activated, but it can be shut off after that.
What it does is popping up the built-in Windows On Screen Keyboard when any field is clicked that requires keyboard input.
Notice : This Standard Windows OSK is dealt with hereunder .
- Although the XXOSK can be changed into a normal keyboard (layout) this is not the most convenient. Therefore the normal Windows OSK can be used as well now, and it looks like this :
Notice : This is the OSK from Windows 8 (the OSK from Windows 7 looks slightly different and is also less functional) but take care that you indeed have this one, which is not the standard one. The one you see here can be activated (if not automatically already) like this (Metro Desktop assumed to be active) :
Settings (in bottom right corner) - Change PC Settings (bottom right corner) - Eas of Access (in the left pane) - Keyboard (in the left pane) - slide On-Screen Keyboard to On.
From now on the one you see above will be active (don't ask how to revert to the unuable big standard one).
This OSK will pop up automatically when in Settings (Services and OSD Section) the new "Use Standard WIN OSK" is switched On and when you use any field (click etc.) where the keyboard can be useful.
Watch out : This has been made for those situations that the (whatever) OS does not bring forward her own OSK. And the most stupid example is this one : Windows 8(.1) on a Windows Surface Tablet using RDC to your Audio PC; although it contains an OSK all right, it will *not* start that when in RDC Mode. But this solves that.
Crucial :
You must be the most careful to *not* start the OSK yourself on e.g. the Windows 8(.1) Tablet or the intermediate PC which can also be in order (like Tablet -> Intermediate PC with e.g. file storage -> Audio PC) because when all are Windows 8(.1) they will all look the same and they will all work. There's one difference though : the OSK on the Audio PC will also give the functionality of the Ctrl and Alt keys as intended. For example, Alt-x will bring up XXHighEnd and supposed the OSK runs on the Intermediate PC it may also start XXHighEnd but *there*. And this is not what you want. But the most prominent and important example is this :
When you're done with the OSK for the moment, you can cross is away, but you can also tap anywhere on the brown-ish surface you see in the picture above.
The Fade button you see in the bottom-right corner (not available on Windows 7) will make the OSK very faint and almost invisible. This may look convenient but in the end is not; what happens is that unlike the XXOSK this OSK stays on top and while it may overlay the Stop button etc. etc., clicking stop will actually bring forward the OSK and no Stop (etc.) was applied. So "click it away" when done is always more convenient and in the end requires one tap only.
The OSK is resizeable in width, independent of height (drag the borders as normally). Important : Do not have the illusion that you can set/drag its size on the tablet itself, because it has too thin borders for that (too hard to grab, even with a small pen). So this, sadly, has to be part of some preparation on the normal desktop.
Under the Options key (see right part) you can switch off "use Text Prediction" which for our application is a requirement (to be switched off). Be careful when you apply this over the Tablet itself (onto the Audio PC !) because the the Options screen is fairly high and under the "Use Text prediciton" checkbox you'll see in there is an OK button which may be outside of the screen. But not use it means don't apply the changes you just made. So put your Tablet upright for this so the screen will be visible in full.
Important (and maybe not obvious) :
If you look back at the before last picture, you see the mouse arrow at the slider for the Library Picture Size. More of these sliders exist in XXHighEnd and it is to be taken that they can NOT be controlled the way we want, even by means of the mouse. This is because their span is often small in size but high in amount of steps. Also look at the slider under mentioned one, which has a span of 1200. All in other words, this is a "resolution" problem. Now, at tapping these sliders the WinOSK also will pop up and this is NOT so you can enter the value (that just does not work). However, you can now use the arrow keys (left and right, but also up and down) to step by step change the value.
Notice that this works the same with the normal keyboard (which you possibly also did not know).
- The Maximum Scaling Factor has been increased from 3.21 to 3.51 so a Phone (Remote Control) can be used more conveniently. However, notice that the middle section is the compromised section, especially in the height, and that the (new, see elsewhere) Up And Down buttons will start to overlap for the Temote which is too low in height (compared to its width and always assumed that you'll use the Remote in landscape mode).
- As implied above, a phone can now be used for Remote Control just the same and without any hassle. Really so.
It is to be noted that the most crucial part of the Remote Control is setting XXHighEnd for size and everything in real time, which is just very well doable. However, it is advised to have a pointer-pen near by during this stage because it works faster and more precise. When all is set, the whole interface can just be controlled by means of fingers without problem.
One thing (but this actually counts for the tablet as well) : there is some preparation in order which will be worked out in separate tutorial. That will be Scaling the Remote Desktop - only there in rough outline at this moment of writing.
- The borders of XXHighEnd have been enlarged so that fingers now can easily grab them for resizing and moving.
The same has been done for "child forms" like an opened Explorer instance started by XXHighEnd. So that too (or any opened "dialog") can now easily be dragged in place etc.
- Meanwhile, for XXHighEnd the borders can be removed all together by means of a new [ B ] button in the right hand border (see above at the mouse arrow).
The content of the XXHighEnd screen is enlarged and the positioning maintained, so more content fits on the screen. Again pressing this button and all is back to normal.
Also notice that this gives better Skinning possibilities because nothing interferes with the border (and colour of it) when it is not there in the first place.
When the borders are not visible, the XXHighEnd screen can be dragged to another position by means of grabbing it anywhere "in" the screen. Notice though that without borders the screen can not be resized, so if you want that, briefly switch on the borders again and do as usual.
- Messages from XXHighEnd or the Sound Engine (XXEngine3) are now positioned towards the top left corner of the screen instead of centered in the screen;
This is convenient for Remote Control and the tablet's screen not really matching the size of the server's screen (where XXHigHEnd etc. actually operates).
Also the messages are now shown with a large font so they can easily be read with the not-the-best eyes.
- When XXHighEnd has been brought up with Alt-x (music still playing in Unattended Mode), the OSK is now operative as were XXHighEnd not on-screen; Previously operating from the OSK was prohibited, but now it can be fully used.
An example of this is having brought up XXHighEnd for any reason, while meanwhile a track plays (starts to play) which you want to put into your Demo Gallery. So now you can happily use the Alt-z button for that.
Watch out : This also works reversely, meaning that when XXHighEnd is up for Attended Playback, the OSK can *still* be used, but better should not because of unpredicted results (and this is because it wasn't really made for this). Example : use Alt-u (volume up) from the OSK and this *will* change the volume, but will not reflect the volume slider in XXHighEnd. In itself this is not a problem, but things have clearly become inconsistent now, and this goes beyond Stop Playback, restart and using the "old" volume again. Beyond means : volume will be unpredictable (may jump two steps down etc.).
Summarized : The OSK can happily be used during Unattended Playback after XXHighEnd has been brought up, but it should not be used during Attended Playback.
- The OSK has always been "on top" which means that it overlayed e.g. the XXHighEnd screen. Now it can be at the back of the XXHighEnd screen just the same, depening on which of the two (XXHighEnd or OSK) was active the last time. And, as usual, we can tap/click somewhere on such a "form" to make it active. Notice that for the OSK this means that the top bar must be tapped/clicked, or otherwise readily one of the shortcuts (touched) will be executed. This in itself means that a small portion of the OSK must remain visible (like at the right hand side of the XXHighEnd screen) so its top bar can be tapped.
Notice that the goal of this is that much (much) more of the XXHighEnd screen can be utilized for e.g. album selection in the Libary Area.
- Speaking about volumes : It appeared that the Volume Slider was not operative (for effect) any more since version 1.186(a) during Attended Playback.
It also appeared that the Volume Slider did not have effect suring Unattended Playback when XXHighEnd was brought up. This though seems to have been an intentional change (in some recent version) but now this volume change possibility has been restored. So : Start Unattended Playback, bring up again XXHighEnd for your own reasons, and change the volume by means of the Volume Slider - this works.
- With the Library Area active, the left pane shows the Embedded Explorer; this area in the left pane has been reorganized for tablet operation so that the short cut buttons visible in that pane remain conveniently reachable for tapping.
Do notice that on the tablet (and the rescaling etc. needed for that) the Explorer part also in there (actually in a layer "under" mentioned buttons) is rendered useless. But also notice that this Embedded Explorer is not required at all for normal (tablet) operation and that it is just one of the more means to select music. This is to be read as : With some different organization the Embedded Explorer is really not required, and for the Remote Control you shouldn't even attempt to do so. One thing : learn Galleries (and the Library Area).
- The shortcut buttons mentioned above can virtually be double tapped (double click on a normal deskop PC will probably not work). What happens is this :
You look for an album in your Demo Gallery (so that one is active in the Library Area). So you type James Brown in the search field at the bottom of XXHighEnd. Now your expected album does not pop up, or in other words, apparently you have obtained nothing of it in your Demo Gallery;
If you now tap (or click) on e.g. the Nice Stuff Gallery shortcut in the left pain, initially the whole Nice Stuff Gallery will be loaded in the Gallery Area. However, if you right after this click, click another time on the same shortcut, the "hot search" for your James Brown will now be performed in your Nice Stuff Gallery (you can see the search field in the bottom automatically being filled with what you previously typed in there). Still nothing ? then tap twice on your Root Gallery shortcut button.
Summarized : if you click or tap such a button and click or tap that again, the old search argument is fed to the Gallery selected. For tapping this comes down to the "double click' mentioned, because you don't need to wait (that second) until the Gallery selected is loaded; You can just tap ahead of that, but actually it is a tapping "one time" again. The system does not see the difference in this case.
- When the above mentioned shortcut buttons are used, now the search field at the bottom of XXHighEnd is selected automatically. So click/tap such a button and you can start typing right away for your search.
- Mentioned Search field can now be double clicked / double tapped, which clears the complete field.
Note : Originally for this version this selected the whole field so it was ready to be overwritten by you (type a first character and all would be cleared). However, it is not said at all that you want to type a new search criterion and you just might want to clear the field so all shows in the Library Area again (you will see this is a regular activity). So what happend is that you would select the whole field and need the On Screen Keyboard to clear it (like with BackSpace), remove the OSK - done. This, while the DoubleClick could just clear the field to begin with - no OSK required.
It is only not standard Windows procedure ... that is all.
Notice that at the first click/tap of the double click the OSK is fired up, and that it is removed right away at the second click. If you now want to type something, click the field again.
- As you may know, the [ 1 ] button in the top of the screen allows for dragging the splitter bar between the left pane/section and the middle section. Normally this bar is set more towards the right and the left pane shows in-out sampling rate and such, while for tablet operation it it crucial to have a sufficient middle section so the bar will be dragged (by you) to the left for this. However :
It appeared quite often necessary to reach the now "covered" left pane and dragging that bar takes some time you don't want to spend. And so :
Tapping the [ 1 ] will position the bar to the other side. So to the right when it's in the left and to the left when it's at the right side. So (supposed) base situation :
Now click where you see the mouse arrow and :
This is the result. Click again that [ 1 ] and you're back to the situation of the first screen shot.
Notice that when this is done with the mouse, the mouse pointer will be automatically positioned on the [ 1 ] again after clicking it (allows for easy briefly looking what the actual contents of the left pane is for e.g. Sampling Rate output).
- Flick Scroll has been applied to the Settings Area, the Library Area and the Playlist Area.
Flick Scroll : move your finger up or down over a vertically scrolling area.
Warning : For uncountable reasons this has to work in a half-flawed fashion, even depending on each of the three scroll areas mentioned. We could say that this is because the environment (which is actually normal Windows) was not made for it really and it had to be "self made", but this is only part of the reasons. So allow us to summarize it as : when all would work as normally expected from a tablet, nothing would work as you'd want for the specific application. One example which will be the most obvious once you used it in practice :
the Playlist Area.
Besides you have to use the "flick" with the finger in the right hand side because otherwise (selection) anomalies occur, you can see what would happen if this would work the same as in e.g. the Library Area. So what you'd really want is moving the selection bar. Notice that this is already related to the coverart showing up in the left pane (per track of a different album within a tenth of a second) but also that this is more intuitive than sliding a part of the tracks in view. And this makes the operation work upside down from normal "flicking". Thus, slection bar follows the finger downwards, which makes the contents scroll upwards ...
Also the "scrolling" is accellerated compared to the move of the finger. So selection bar moves faster than your finger, which in pratice is all what you'd want. You will see ...
Not so for the Library Area because you would miss more than what you are looking for, which is all related to the (readable) size of the coverart in there and the amount of coverart which fits in the view to begin with. Playlist Area is completely different for this already, and Settings Area ... well, that allows for the usual acceleration - flick harder and scrolling goes faster until it dies out. Why that here ? well, because the contents is familiar to you and you will automatically see when you ended up too far (and now flick back a bit). Not so with the Library Area, because you wouldn't know what you have missed.
- Besides the Flick Scroll possibility, there are two new buttons in the right hand border of Library Area and Settings Area : one to go all to the top, and one to go all to the bottom. Both show as double arrows opposed to the "one page" scroll previously existing buttons which are single arrowed.
- The Stop button now accepts a RightClick which brings forward a choice of Shut Down or Reboot.
This can be convenient for Remote operation, because such a connection (like RDC) may not offer the Shutdown or Reboot option from normal Windows.
- Close to the Search field at the bottom is the little box usually showing "A". This is the "A" from Album and it can be changed to "T" for Tracks and an applied Search will now search in Track Names. Nothing new here;
The result of any search can be saved in a Saved Result List (RightClick on the [ F ] button with the Library Area active). Still nothing new. New is :
When the Result List from a search in tracks is named "AllTracks", double tapping (or double clicking) on that litte text box changes the value of "A" to "T" and the AllTracks Result List is loaded in the Library Area. The effect ? with that one double click/tap you can load all of your tracks within a fraction of a second now, and it doesn't require scrolling through the Save Result lists for that (which is redious for the tablet anyway).
DoubleClick/Tap once more, and the "T" changes to "A" and the main Music Root is loaded (same as the [ M ] shortcut button in the left pane). Also see next topic.
- The Search in Tracks always worked upon the full folder path to the Track Name; This has appeared to be very inconvenient because when looking for e.g. "Love" because you're in the mood for some love song, a 1000 albums pop up with "love" in their Album Name and from each such albums all tracks show, no matter such track is named "A bullit for you"; Not what you intended.
So now the Search is applied to the Track Names only.
- The Library Area can now be enlarged to the full size of the XXHighEnd screen; This goes by means of the [ L ] button in the right hand border of XXHighEnd (we call this "the Large Library Area").
Once in there, the [ < ] button goes (back) to the normal Library Area (size).
The [ R ] button in the right hand border causes Randomizing the content as usual (that button normally shows in the bottom pane with the normal Library Area).
Under that there's a [ P ] button which goes (back) to the Playlist Area.
And under that again there's a button initially showing [ 0 ], the number (0) indicating the number of tracks loaded in the Playlist. When an Item in the Library Area is selcted (or more of them) and that [ 0 ] button is tapped (clicked), the tracks of those Items are loaded in the Playlist and when that's e.g. 2 tracks (now loaded) the button shows [ 2 ].
Double tapping (clicking) this button will clear the Playlist.
When an Item in the Playlist Area is double tapped (double clicked) the tracks of it load in the Playlist after clearing the Playlist first (this is normal behaviour). After that the Playlist Area will be shown (also as usual).
- Next to the Volume Slider (in the left pane) now the Normalized Volume also shows - under the native Volume.
- In the Embedded Explorer the "Root Buttons" are shown (like [ M ] for Main Music Root or [ N ] for Nice Stuff, etc.);
The Root which is active will now show the Root Button concerned highlighted. This is convenient when the Large Library Area is active because there's no textual confirmation which is visible in the normal Library Area otherwise.
So here the Demo Gallery is the active one (shows in Red).
- The XXHighEnd screen can now be moved (dragged) by means of pressing (finger) any empty area on the screen and drag. Works with the mouse too of course. Notice though (as mentioned earlier) that this is only possible when the borders are made invisible ([ B ] button in the right hand of the screen).
- Although it is not really XXHighEnd specific, the controlling PC (like tablet) can take the maximized form of the source PC (which normally is the Audio PC). Look here for a tutorial :
Scaling the Remote Desktop
User InterfaceAlthough largely described above, also a number of general changes have been applied. Such as : - The colour rendering has been changed and now better reflects the colour of the Coverart in the left pane (with the slider in the left border set to the 2nd or 3rd position).
- The default colour settings have been changed.
- In the previous versions supporting the Gradient Designer, it was possible (deliberately) to also render the buttons for Play, Stop etc., which *also* could render them invisible.
Now this gradient rendering of these buttons is not possible any more, which in the end gives more flexibility (possibilities) to make nice gradients ([ G ] button near the bottom).
- Not really new, but good to know for those who get blind of the shown screen shots in these Release Notes and think they won't like it, here's a main means to control how things show for colours :
Watch the slider in the left hand border; it is at its lowest position. The colours you see now are to be regarded the base for developing the gradients you see and the setting of this slider is not really one to use throughout (although it perfectly can).
Now the slider is in the 2nd position and the screen is rendered like you see with the notice that this depends on the Coverart.
The 3rd position of the slider. Just another means of rendering.
The topmost position and now the gradient rendering is switched off. Notice that you now look at the background colour setting as set in the Skin Settings (under the [ S ] button near the bottom).
Here this backgrond colour was changed.
And back to the "development" setting of the slider we see that the background colour influences the gradient rendering.
Lastly, like the blue colour of the 3rd screenshot above which is the default setting, the gradient settings are default just the same. So those too can be changed by yourself ([ G ] button near the bottom).
- Those screens/functions which are prone to be used from the remote tablet have received a larger font size.
- The buttons in the top left pane now are of the same type as the others.
- The old left overs of a previous (grey) interface have been removed. Similarly, forms (programs) initiated from XXHighEnd (could be Explorer) don't receive the nasty grey any more.
Same with the Messages given by XXHighEnd.
- The default of how the Items in the Library Area show have been changed back to "TextUnder" (as how it ever was).
- The Running Time in Bar fashion (for Unattended) will always refresh when something like Volume Change is applied. During this refresh, the already past time will now show in a smaller bar and we can see where we applied the last change.
(not super useful but this was made for some debugging and it was left in because a "feature" now).
- The positions of the "Root Buttons" (like [ M ] and [ D ] and such) have been rearranged to better suit Remote Control. This may come across as akward because when using Remote Control indeed (and a now relative small screen assumed) they overlap the Embedded Explorer. However, it is assumed that this can't be utilized anyway with the smaller screen so this was "allowed". And now for the better, assumed that the Library Area is used for album/track selection, where those Root Buttons will lead you easily to that and which are perfeectly suitable for the Remote Control (screen).
- The positioning of the Wallpaper Coverart and OSD (On Screen Display) texts have been changed somewhat for the vertical outline;
All is now oriented towards the top of the screen, thus also the bottom OSD line of text (showing the Track Title). This is again to fit the often vertically smaller Remote Control (tablet etc.).
Crucial : The set Max Height (in Settings) of the Wallpaper Coverart (nothing changed regarding that), now plainly determines the most bottom position of the OSD graphics. In sequence from top to bottom this is displayed :
OSD Running Time - OSD Top Text (Album Title) - Coverart - OSD Bottom Text.
Because this is all done with the least space in between the elements, it will be the Height of the Coverart determining the most bottom position of the whole (but which is the Bottom OSD Text). And thus : fit this Max Height so that your Remote shows the OSD Bottom Text just at the bottom of the screen.
- Although maybe not visible at first glance, the area with the "Play Buttons" as well as the panel visible at the bottom when the Library Area is active, has been completely revamped;
All has been squeezed for maximum utilization of the available space - and then thinking of the largest Scaling Sizes so a Phone can easily be used to control the whole of the user interface.
- XXHighEnd is now fully DPI aware (which is the official naming for being independent of the resolution of the monitor used and then thinking about "the higher the resolution the smaller the program will show");
Of course the Scaling which is available for a longer time actually already did that job ([ S ] button near the bottom) but this is different from you setting the monitor's DPI (Dots Per Inch) setting at other than the standard 100% (like 125%, 150% or any custom value - see rightclick on desktop - screen resolution - make text and other items larger or smaller). For the DPI setting too a provision was there already, but this didn't work well, say because the way it was applied happened in a wrong fashion. Now this is all fine.
To understand :
Both the Scaling in XXHighEnd and the monitor's DPI setting influence the size of everything in XXHighEnd. However, the DPI setting influences really all on the screen, thus also Word, Excel, Notepad, email - everything. Now, it is the latter group you may have increased the DPI setting for (on high resoluttion screens like 1920x1080 because otherwise the programs and most in it become too small to see/read). This means that all within XXHighEnd also grows but that doesn't go in the exact same fashion as how XXHighEnd does that herself. This is because all in XXHighEnd will be scaled for 100% everything in the same fashion, while what the Operating System does is not applied 100% the same to everything. And more difficult to understand perhaps :
The "100% the same" of XXHighEnd is actually not true because for those things which don't require the enlargement, it is not done because a waste of precious space (think Remote by means of a Phone). The result of the "combination" of both the Scaling in XXHighEnd and the DPI larger settings of the monitor is this :
- When the 150% setting of the monitor is applied (which is fairly large already) *and* the largest Scaling Factor fo XXHighEnd is applied (which is 351%) then all is fine. To understand the "al is fine", think like both frew in a similar super large fashion.
- When the 150% setting of the monitor is applied, but you want XXHighEnd very small, this can be done by Scaling XXHighEnd with a factor of 1.00 (= 100%) BUT now some things are too small to hold the characters with the very large font which (scaling) is plainly applied by the OS. So it works, all is positioned at the correct place, but the characters may fall out of their boxes so to speak.
- When the normal 100% setting of the monitor is applied, but the Scaliing of XXHighEnd is set to 3.51 (351 %) again all is fine. How ? well, XXHighEnd can take care of everything on its own.
Difficult to understand why the subject is brought up in the first place ? Well, this is about you first possibly dialling in that 150% DPI setting, to next accept that this is REALLY large and that it would be normal to also see all of XXHighEnd so large. And if you don't want that ... what to do. Dial back your 150% DPI setting because of XXHighEnd ? no ... just think about the 3.51 facto in XXHighEnd being quite consistent with the 150% DPI and that you can dial back the 3.51 do e.g. 3.00 or 2.70 etc. etc., until you yourself think it becomes unacceptbale. So stop there and next accept what you see. Also : play with all a little to see what's happening.
A last remark about this all :
Some elements can not be controlled by XXHighEnd because they are controlled exclusively by the Operating System. An important example is : scrollbars (important because you like to control them by finger and this is undoable when they don't grow to sufficient size). Solution to that : Increase the DPI setting. Now they grow because the OS is doing it, but with the notice it still might be insufficient (for your fingers). But also : almost all of XXHighEnd has been made so now that using the scrollbars is not necessary. Almost all is not all though and it is up to you what you use or want to use which can also be outside of XXHighEnd. Explorer for example.
Moral of all of the above : You might want to use the DPI scaling of the OS alongside the Scaling of XXHighEnd. And : this is now all allowed and works fine (and in the previous version(s) this was not so).
General - New / Changed- There's a new Driver available for the Phasure NOS1a D/A converter for Windows as well as Mac. Drop us an email when you want it BUT do that only when you really need this (do it for fun is useless).
Important (only for NOS1a owners) :
- Once this Driver has been installed, the unofficial XXHighEnd 1.186-i version should *not* be used (1.186-a is OK).
- When on Windows 8 or above and this Driver is to be used *and* you want to use XXHighEnd, you will *need* XXHighEnd 2.00 (see next topic).
- When you use XXHighEnd 2.00 you will *need* this new Driver (1.04) or otherwise you can only play 44.1 based material ( 44.1, 88.2, 176.4, 352.8 ).
Edit May 13, 2015 : BUT, the 2.00-a version (which is the actual one for download now) contains a Driver103.tss file. If this file is renamed to Driver103.tst you can use the 1.03 Driver version. Notice that if your file extensions do not show you may see "Driver103" only (while it is really named Driver103.tss).
- Phasure NOS1a owners only (important) :
In Settings there's a new button in the Output Section tagged "Driver Signing". This button needs to be set to "Drivers need not be signed" when the 1.04 Driver has been installed on Windows 8 (or higher). A necessary reboot wil be the effect.
The text on the button itself will at first show "Refresh" and clicking it will show the current state. Next the text on the button will show "Change" and once the button is now clicked again, a reboot is required; not doing so (like clicking the button again) will make the state unreliable until a reboot happens. So always reboot right after an attempt to change.
(and change back to the necessity to work with signed drivers is possible just the same; but there's no real reason for this)
Do this (set to "Drivers need not be signed" + reboot) before installing the new driver.
Additional outlay for NOS1a owners :
Try not to get hyped or confused about needing the new Driver before attempting the new 2.00 XXHighEnd version; all what will happen in comparison to the 1.186-i version you were using so far is that playing 48KHz based sampling rate material ( 48, 96, 192, 384 ) plays at a 10% too low speed. So just avoid playing that for now and get/install the driver in a few spare minutes, later. Redbook CD ( or 88.2, 175.4, 352.8 ) plays fine as it is.
- A new set of "Custom Filters" have been created, all based upon Arc Prediction.
Look here for the description : Filtering.
- A great new feauture is introduced with this version :
Play tracks (or albums) from the Compare Tracks functionality.
First a small revisit to Compare Tracks itself :
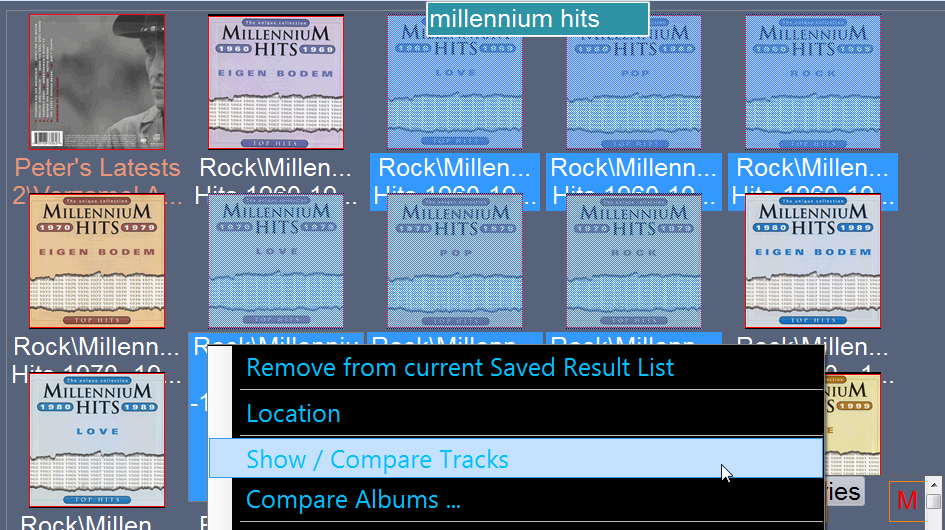
... where you see the selected Items and how right-clicking on of them shows that menu. Now choose Compare Tracks ...
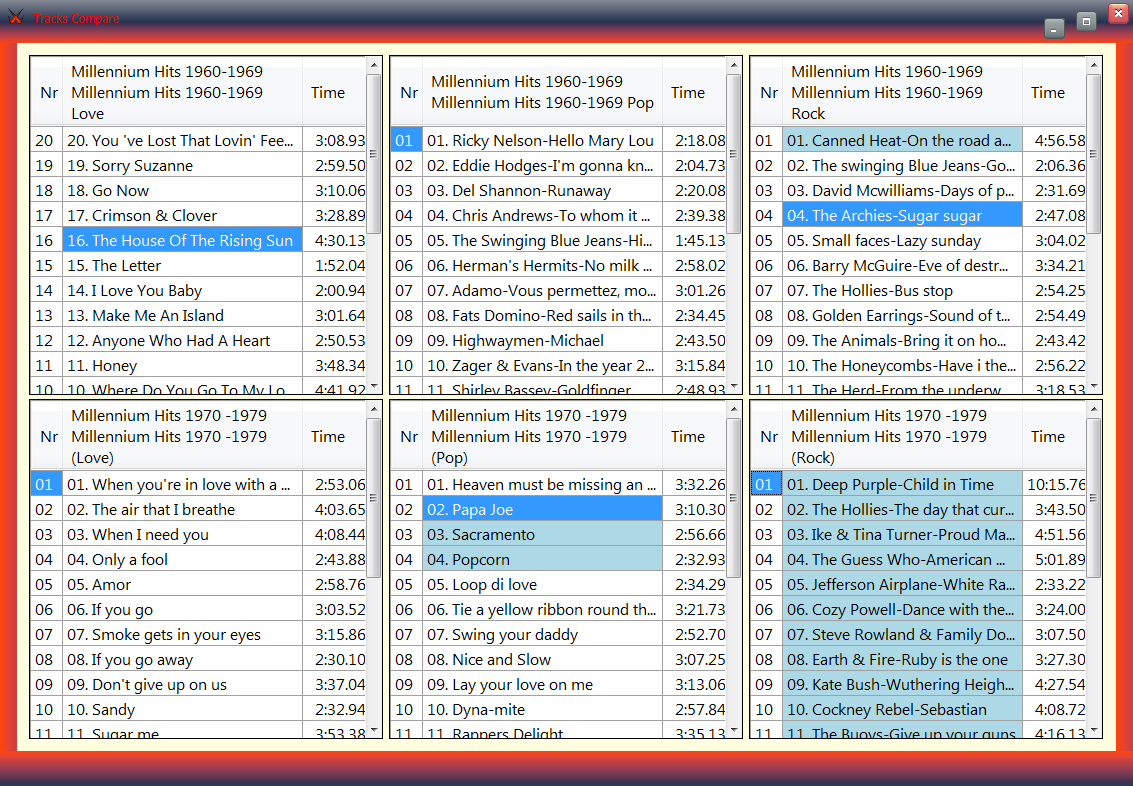
This is what shows for the 6 albums. You see several tracks in a highlighted (blue) colour which means that they were clicked. Now notice that tracks were clicked in this sequence :
Canned Heat in the 3rd grid, The Archies in the 3rd, The House of the Rising Sun in the 1st (after sorting it descending on track number ("Nr"), Popcorn, Sacramento and Papa Joe in the 5th, Everything in the 6th by means of clicking the Title header.
And this is now the result in the Playlist Area :
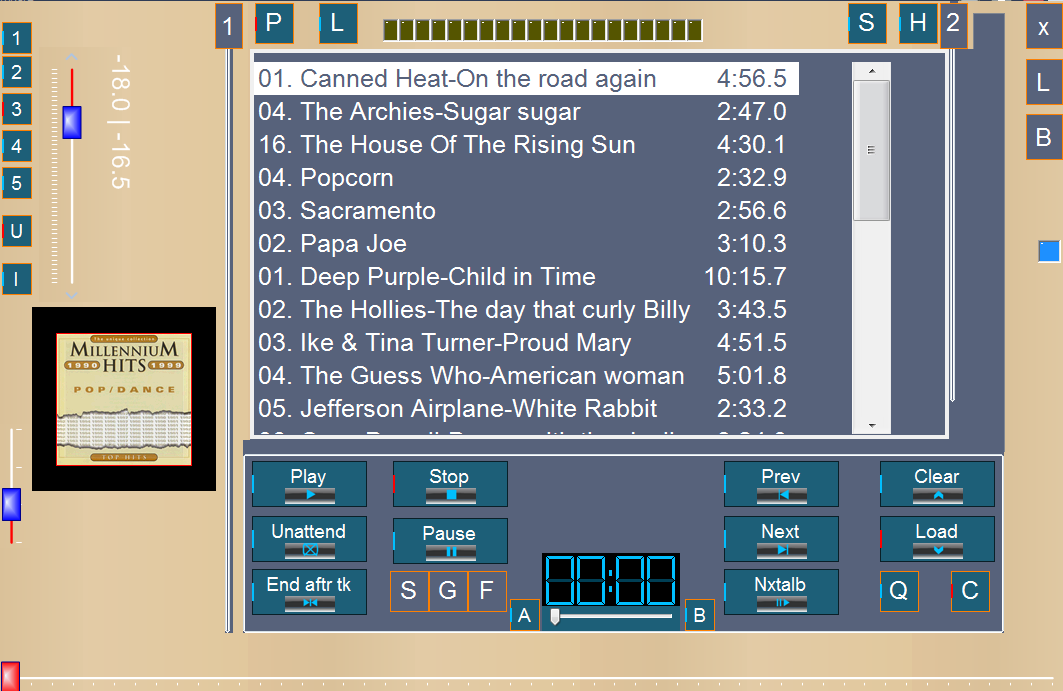
Here's the functionalities summarized :
- When you click on a row in any of these grids, the track concerned will load in the Playlist Area.
- When you click on the header with the Item Title (will be normally be an Album Title but actually is a (Gallery) folder name) then the whole contents for tracks you see will load in the Playlist Area.
- Crucial : When you double click on a row or title, the Playlist Area will be cleared.
Why crucial ? because Remote Control assumed, this screen will overlay the XXHighEnd screen with the controls for e.g. clearing the Playlist Area. And, when used after previous playback has finished, you will like to clear the old Playlist.
When done with your selection, cross away this screen so now XXHighEnd's screen can be used (is visible again) for further normal control.
- Although you can select 9 Items at a time, you can repeat this little process as many times as you like before you start Playback. You can also select as many "rows" (is tracks) by means of clicking/tapping as you like.
Also, the sequence in which you make your choices can be randomly over the different grids.
Notice that when the Large Library Area is active, you can set this screen so that at the right side of it the number of loaded tracks in the Playlist Area is visible (see above, above the [ P ] button (on the XXHighEnd overlayed screen) in the right hand side).
- While you can select 9 Items at a time, it is not said that all 9 will fit on your set (for size) screen; this will depend on the size of your Remote's screen. It is, however, assumed that always 3 grids will fit next to each other, while the number of rows on them will depend on your Remote's size. Can your remote contain one row of these grids only ? then you will select 3 Items max at a time only (you can still do more but they will vanish under the screen's bottom border).
- The location and size of this screen is saved for the next start up, so you can set and size it to your convenience (think about what more you want to reach when this screen is actually on top).
- You will notice that the scroll bars on the grids are actually too small in width to conveniently control with a finger. Also, this scroll bar will be there often because the grids can not contain an infinite number of tracks, obviously. Now :
Instead of using the scroll bar to reach a bottom half of at first invisible tracks, you can also click on the "Nr" header, which now will scroll downwards in the grid.
Watch out : This is not what the examples above showed, because in those sorting on the first column was implied. But this didn't want to work reliably and scrolling is now provided instead.
When data is available to scroll down to, a down arrow will show; when no (more) data is available a double uparrow will show. And in the case of the latter, when you scrolled down all the way, tapping/clicking the header again will show the begin of the list.
- The contents can be sorted by the column showing the track times (ascending or descending); click/tap the header of it.
- Previously the grids could be scrolled on the Compare Tracks screen, horizontally. This is not possible any more (not really a feature of course, but it couldn't be done in the new set up).
- As mentioned a couple of times above, there's a new "Show" Gallery now;
In Settings, a Gallery Folder can be appointed for it, and Alt-w during Unattended Playback puts the currently playing track in the appointed Gallery Folder.
Notice that Alt-w is reachable from the OSK under Cmd-2 (see screen shots of the OSK higher up).
- The Show Gallery is special, to the regard that its denoted Gallery Folder can be easily switched to another, even when working from the Remote :
The [ S ] button was Right Clicked here, and a same "Select from Tablet" screen pops up as has been mentioned earlier on (see more above and notice that this one too can be flick scrolled). From here you can tap another Gallery folder :
which actually changes the Settings in XXHighEnd with this as the result :
This is actually quite powerful, because with this you did two things at the same time :
1. From now on all what's obtained in the Show Gallery (Alt-w) goes to the "Hits" Gallery as per the example above;
2. From now on you can use the [ S ] Root Button (see screen shot above) to obtain the "Hits" in your Gallery Area.
The point, of course, is that you can easily and ad-hoc switch one of the easily reachable Galleries for both causes, which is the Show Gallery. And, you can do it via the Remote in a wimp.
- If you look again at the last screen shot, you see a graphic of a mouse in the top-right corner ot the [ S ] button. Here you see it again one in the Stop and the [ F ] button :
It means that the button carrying such a graphic can be right-clicked (with functionality).
Notice : This is not shown in all the screen shots of these Release Notes (the graphic there yet when they were made).
The colours of this graphic are created for the three parts it consists of from (see Skin Settings ([ S ] button) :
- The triangle blue-ish part from the Button Hover Background colour.
- The outline of the mouse (orange here) from the Button Border Colour.
- The filled right part of the mouse (red here) from the Headings Text Colour.
- RightClick / Tap on a track in the Playlist Area now shows a new function : Add whole Album.
This is convenient for when you loaded some track from your Demo Gallery but you next want to listen to the complete album.
- There's a new Ctrl-Alt-L which starts those Services stopped when Unattended Playback started (normally in Minimized OS Mode).
Notice : There is no real reason to apply this, except for when Windows 7 is used with the LAN shutting down during playback; in this case of Windows 7 it takes a relatively long time to start up the LAN Services which can be required for various tasks; one of those is just bringing up XXHighEnd (for a next album selection etc.) and when this is foreseen the Services concerned can be started in advance so later no waiting for them is needed (can really be up to a minute !).
A bit vague ? then never mind. But it can be useful.
- Each time the functions "Add to Gallery" for Demo, Show and Nice Stuff are used, the environmental data (read : all relevant Settings) are stored in a file for the album/track concerned. There is no Retrieval for this yet, and it is the idea that this will allow us to see under what conditions a track etc. was put to one of these Galleries (assumed it was done because sounding so good). Later, when the track concerned does not sound good at all, we might wonder what the h*ck was going on when we thought it was so OK ...
Each time a same track is obtained in one of these Galleries the data is overwritten, but, only for the same Operating System. So for each version of the OS where the track was obtained to such a Gallery, the data is stored.
- When in the Library Area it can happen that you want to go back to somewhere "in the middle" while the amount of Items in there can make it very hard to find back that Item (e.g. Album) *while* the full list must be maintained. Think of this scenario :
You apply a copy operation and this is interrupted; you know what the last Item copied was, and now you want to proceed where it left off. Typing at the bottom for "Hot Search" does not work, because that right away will minimize the list to that search criterion. What can be done now ?
Search that Item via Hot Search anyway and click the Item you actually want (to proceed with etc.); Now empty the Hot Search field so all shows again. Now rightclick on a random item and choose Location. In the menu now showing there's a new selection "Locate last clicked Item". Click that and your Item will be in view, ready to proceed with whatever you like.
- We can now RightClick on the Stop button and from there a menu pops up with choices for Rebooting the system / Shut Down the system.
This is convenient when Remote Desktop Control is used and no monitor/keyboard is available for the system itself.
(Notice that RDC normally does not allow for Reboot and Shut Down)
- For the Library Area and when Tracks are shown in there :
The bottom text field for the "hot search" now will search in the Track Names only;
Previously this search was applied to the complete folder structure (names) and it appeared that this was not convenient. How ? well, because when we'd search for e.g. "harvest", clearly implying a search for Track Names with "harvest" in them, now also the whole "Harvest" album (Neil Young) would show for all its tracks (and yes, one of them is named Harvest and the other 9 tracks would show without reason).
- Files and Folders can now also be pasted (from Copy-Paste) on to the Playlist Area.
See RightClick on the Playlist Area and the new option "Paste from URL".
Please notice : Although the function has "URL" in its name - like from a website link - and although it is meant for that, at this moment this in particular does not work yet. Copy-Paste from normal files or folders does though.
Copy and Paste instead of Drag and Drop can be convenient because the program to drag from is not always easily in view together with the Playlist Area of XXHighEnd - and then Drag-Drop cannot work. Copy-Paste always works.
It is also allowed to Copy-Paste a higher level folder (read : with several sub folders with albums in them).
Lastly, you can just the same Copy-Paste from Galleries.
- It is now possible to bring up XXHighEnd during Unattended Playback - make changes to the Playlist Area - Quit XXHighEnd - and have those changes sustained at the next startup of XXHighEnd.
Previously this could not work (changes dis not sustain) which was actually quite annoying. So now this allows for creating a new Playlist while an old one is still playing and when done quickly go back to the best mode for SQ (which is quitting the XXHighEnd user interface).
- When the current Playlist (Unattended) ends and a new Playlist has been loaded (seee above) the new Playlist will automatically start playing. Do notice though that the XXHighEnd screen is auto-brought up and that you see the new tracks preparing for Playback as usual; if you don't want this new Playlist to play after all, just press Stop.
Also, when you apply Alt-K when the "old" Playlist is playing (end Playback at currently playing track) this is regarded as the end of that Playlist just the same, and the new Playlist will start playing just the same (as dedcribed).
- In conjunction with the above, there's a new Ctrl-Alt-n which can be used at Unattended and which starts playback at the beginning of this this new Playlist when the "old" Playlist is still playing. Do notice that playback can only start at the beginning indeed. Thus, if you used what's described above here for adding tracks to an existing Playlist, then this isn't really useful (Playback will start at the beginning all right, but you already played that first part).
- When you look more up into these Release Notes you see two screen shots of the OSK next to eachother; there you can see that under Cmd-2 (2nd screen shot) there's a new Alt-NP showing, meaning : Next Playlist. In other words, this represents the new Ctrl-Alt-n (see above).
- It is now possible to skip 60 seconds while Playback is going on;
Just press the Play button (while it's thus actually active already). For Unattended use Alt-p.
When there's no 60 seconds left in the track to play, nothing will happen.
- Assumed that XXHighEnd is on RAMDisk and that Playback happens from RAMDisk (point Playback Drive to RAMDisk) - it is now so that zero disk or LAN I/O will happen during the playback of a Playlist.
Previously disk I/O (or LAN I/O !) was still possible, depending on several situations like Cue Files in oder (needed to work out the Cue File data per track during playback for each new track in order) or Wallpaper Coverart to show (had to get the Coverart from disk or LAN).
Apart from this being a good thing in general, do notice that for some people (depending on the PC being "on par" or less of that) this could imply small stalls at track boundaries; this is now virtually impossible.
- When during Unattended XXHighEnd is brought up and a new Playlist is loaded, previously it required Stop before Play could be applied. Now the start of Playback the new Playlist can be done by just pressing Play (which noa automatically implies a Stop of the old Playlist).
- Track Times now also appear on the Back of the Wallpaper Coverart, next to the Track Name.
- The [ X ] button on the Q-settings panel (the panel that opens when clicking the [ Q ] button near the bottom) closes that panel as usual; however, the positioning of this [ X ] button at very high Scaling Factors could be in the way of controls on that panel, so when it does it now repositions more to the right (and so its position varies now).
Because of this possible (as appreciated) "inconsistency", clicking the [ P ] button in the top (for the Playlist Area) also closes the panel (think like "resetting" to opening the Playlist Area).
General - Solved- Alt-L skips to the next album in the Playlist Area (for Unattended Playback). This function has been there for a long time, but or it stopped working in one of the later versions, or it never worked properly; Now it does.
- Ctrl-Alt-L depreciated regarding the loading of selected albums in the Library Area;
Possibly this has never been official, but has been in there anyway. Not so any more (see subject above).
- There has been a bug in the addressing of more than 12 cores processors. This has now been solved (20 core processor support).
- Some anomalies have been solved regarding the XXHighEnd data which was changed under RAMDisk operation and therefore not (all) stored on permanent storage.
Regarding this, there's also a ToolTip added now on the "Copy Setting to" field (please read or otherwise what you intend still won't work out).
- Cue Files : AIFF files when obtained in a FLAC container, would not explode to their individual tracks. This has been solved.
- Cue Files : It always has been a problem to put individual tracks in e.g. the Demo Gallery, that is, retrieving them from there. In version 1.186-a a solution was provided but that made it worse. The effect : only the first track of a Cue File album was loaded, and next the whole album and that as many times as there were tracks to load.
This is now all solved, it all is right.
- When a RAMDisk is used, it could run full early because certain intermediate files were not deleted (mainly HDCD related). Solved now.
- A situation has been solved that could imply the loss of the license to XXHighEnd (in very rare conditions).
- It has always been possible to change the location of the XXData folder. Nice, but when done, the contents was "officially lost". Now the contents is auto-copied to the new location implied.
- The daily saved Preset Loader Settings Files (.XXSS) were abusively saved in the XX Folder. This should have been done to the XXData folder. Solved now.
- The ToolTip on Q4 still showed the special value of 30 which was already not in order any more from of version 1.186.
- Persist = Yes is allowed now for Keep LAN Services while Stop All Services is activated (this is for when in Minimized OS).
- When going from Minimized OS to Normal OS an error message could show "Error writing TI" (etc.). This has been solved.
- Several functions existed which required the restart of the LAN but did not do that. Now they all do.
Please report when you find one which still does not.
- With many Items in the Library Area it was impossible to scroll by means of the (small) scroll button (call that a bug). Now this works.
- When using Alt-n (next Track) the Sound Device could get wrongly selected in rare occasions (effect : no sound any more). This has been solved.
- A remark more in general but important :
The OSK (On Screen Keyboard) *must* be started from the very same Drive/Folder as where XXHighEnd is started from. In the end this is related to starting XXHighEnd from RAMDisk and the icon you might have for the OSK must also be created for the XXOSK.exe that will be on the RAMDisk (copied along with the other files when the XX folder is copied to there).
- When the Library Area is set to show Tracks (think 100,000+ of them) it could easily happen that an error occured while browsing through them. This bug has been solved.
- In Windows 8 (and above) the Coverart Wallpaper never worked (could not work) any more for Unattended.
Now this has been solved. Notice though that in Windows 8 the painting of the Wallpaper goes fairly sluggish.
Side note : For Unattended it is not the normal Wallpaper mechanism used now; for Attended it still is (nothing changed there).
- Similarly the Running Time could also not work for Windows 8 and Unattended. This too now works again.
- It appeared that using two subsequent Pause commands (plus Play) actually never worked (could work). So the second would imply starting from (close to) the beginning of the track.
Now this works.
- Maybe people noticed that just after playback starts (Attended hence the XXHighEnd screen stays), the "focus" was given to the XXHighEnd screen. So for example, click Play, click an Explorer instance (etc. etc.) and when one second later playback starts, the XXHighEnd screen is on top again and you must reselect that other program you wanted to work with.
This annoying "feature" has now been taken out.
- Although version 1.186-1 has not been official, it was used by some (because made available) and the preliminary Custom Filter in there would not allow "24 bits only" (DAC Needs = 24) DACs to play (caused static). This is now solved.
- Although it has never been reported, it was found that "24 bits only" DACs would play with small ticks at Track Part starts (Split File Size) boundaries. This has now been solved.
Issues- It may seem daft, but it is possible that 16 bits DACs don't play. Notice this is about DACs with no other input possibility than 16 bits.
Over here we don't have such a DAC and it implies that this can not be tested. The effect could be that the speed is not correct, or that ticks appear in between Track Parts (at split File Boundaries). Please report your findings if you own such a DAC.
- Edit May 22, 2015 : As it appears, quite some issues exists with combinations of Wallpaper and OSD settings. Best is to use Wallpaper Coverart and Running Time OSD as Progress Bar (so these both together). The other possibility is not to use the Wallpaper Coverart but also explicitly deactivate "Running Time OSD" and "As Progress Bar" (this is not intuitive and in the end a plain bug).
Reminder for Windows 8 users : Don't forget to install the Windows 7 Shell provided with XXHighEnd. See the Windows7_Shell folder in your XX folder and don't forget to read the readme's in there ! Notice that this Windows 7 Shell does not work for Windows 8.1.
Just start the XXHighEnd.exe file; no Install as such is needed. See below at the mouse arrow. |
|
|
|
« Last Edit: May 24, 2015, 09:24:13 am by PeterSt »
|
 Logged
|
For the Stealth III LPS PC :
W10-14393.0 - July 17, 2021 (2.11)
XXHighEnd Mach III Stealth LPS PC -> Xeon Scalable 14/28 core with Hyperthreading On (set to 14/28 cores in BIOS and set to 10/20 cores via Boot Menu) @~660MHz, 48GB, Windows 10 Pro 64 bit build 14393.0 from RAM, music on LAN / Engine#4 Adaptive Mode / Q1/-/3/4/5 = 14/-/0/0/*1*/ Q1Factor = *4* / Dev.Buffer = 4096 / ClockRes = *10ms* / Memory = Straight Contiguous / Include Garbage Collect / SFS = *10.13* (max 10.13) / not Invert / Phase Alignment Off / Playerprio = Low / ThreadPrio = Realtime / Scheme = Core 3-5 / Not Switch Processors during Playback = Off/ Playback Drive none (see OS from RAM) / UnAttended (Just Start) / Always Copy to XX Drive (see OS from RAM) / Stop Desktop, Remaining, WASAPI and W10 services / Use Remote Desktop / Keep LAN - Not Persist / WallPaper On / OSD Off (!) / Running Time Off / Minimize OS / XTweaks : Balanced Load = *62* / Nervous Rate = *1* / Cool when Idle = n.a / Provide Stable Power = 1 / Utilize Cores always = 1 / Time Performance Index = Optimal / Time Stability = Stable / Custom Filtering *Low* (16x) / Always Clear Proxy before Playback = On -> USB3 from MoBo -> Lush^3
A: W-Y-R-G, B: *W-G* USB 1m00 -> Phisolator 24/768 Phasure NOS1a/G3 75B (BNC Out) async USB DAC, Driver v1.0.4b (16ms) -> B'ASS Current Amplifier -> Blaxius*^2.5* A:B-G, B:B-G Interlink -> Orelo MKII Active Open Baffle Horn Speakers. ET^2 Ethernet from Mach III to Music Server PC (RDC Control).
Removed Switching Supplies from everywhere (also from the PC).
For a general PC :
W10-10586.0 - May 2016 (2.05+)
*XXHighEnd PC -> I7 3930k with Hyperthreading On (12 cores)* @~500MHz, 16GB, Windows 10 Pro 64 bit build 10586.0 from RAM, music on LAN / Engine#4 Adaptive Mode / Q1/-/3/4/5 = 14/-/1/1/1 / Q1Factor = 1 / Dev.Buffer = 4096 / ClockRes = 1ms / Memory = Straight Contiguous / Include Garbage Collect / SFS = 0.10 (max 60) / not Invert / Phase Alignment Off / Playerprio = Low / ThreadPrio = Realtime / Scheme = Core 3-5 / Not Switch Processors during Playback = Off/ Playback Drive none (see OS from RAM) / UnAttended (Just Start) / Always Copy to XX Drive (see OS from RAM) / All Services Off / Keep LAN - Not Persist / WallPaper On / OSD On / Running Time Off / Minimize OS / XTweaks : Balanced Load = *43* / Nervous Rate = 1 / Cool when Idle = 1 / Provide Stable Power = 1 / Utilize Cores always = 1 / Time Performance Index = *Optimal* / Time Stability = *Stable* / Custom Filter *Low* 705600 / -> USB3 *from MoBo* -> Clairixa USB 15cm -> Intona Isolator -> Clairixa USB 1m80 -> 24/768 Phasure NOS1a 75B (BNC Out) async USB DAC, Driver v1.0.4b (4ms) -> Blaxius BNC interlink *-> B'ASS Current Amplifier /w Level4 -> Blaxius Interlink* -> Orelo MKII Active Open Baffle Horn Speakers.
Removed Switching Supplies from everywhere.
Global Moderator
|
|
|


